Wax Shrinkage and Tunnelling: A Thermal Explanation for a Visual Defect
A candle comes back from a customer with a crater around the wick and a ring of unburned wax at the glass. The factory blames shrinkage, the wax supplier blames the wick, and the next batch changes both. The defect is usually simpler than t
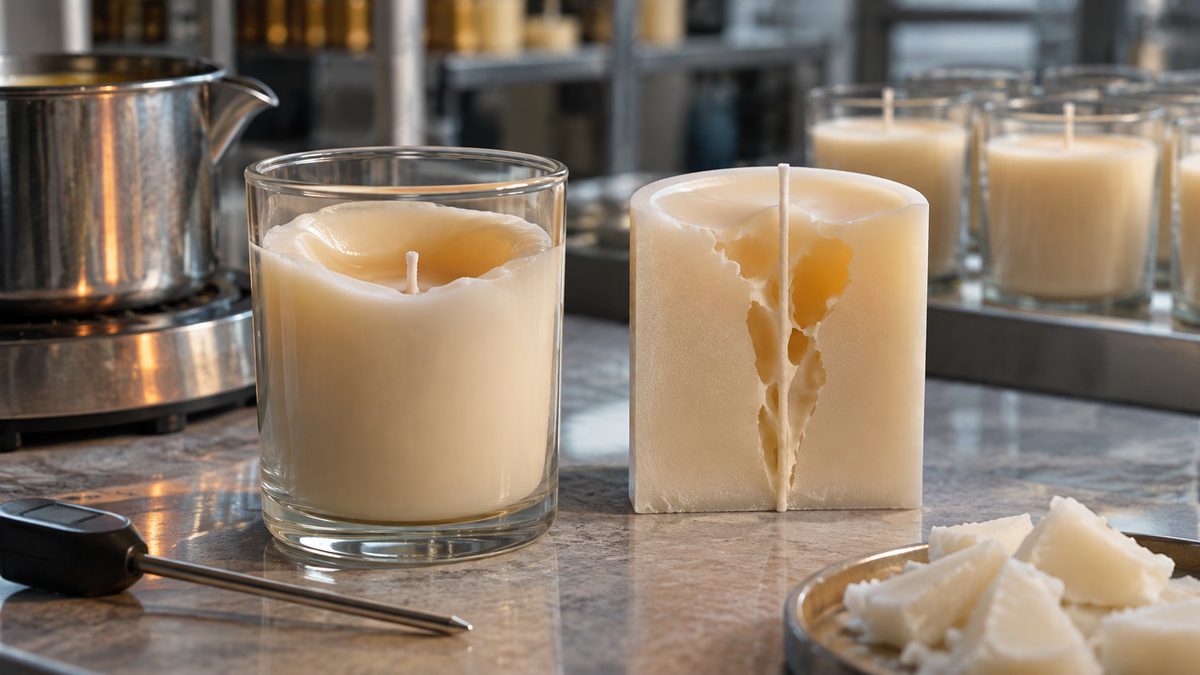
A candle comes back from a customer with a crater around the wick and a ring of unburned wax at the glass. The factory blames shrinkage, the wax supplier blames the wick, and the next batch changes both. The defect is usually simpler than that, and the two mechanisms involved are not the same.
This article separates shrinkage from candle tunnelling, explains how an air gap changes heat flow through the vessel wall, and sets out a test sequence that identifies which mechanism is actually causing the crater.
Table of Contents
- Two defects, often confused
- What shrinkage actually does
- Why an air gap insulates
- The thermal balance behind tunnelling
- Pour and cooling variables
- Practical guide: diagnosing and fixing the crater
- Frequently asked questions
- Conclusion
Two defects, often confused
Shrinkage is a volume change on cooling
Almost every wax contracts as it solidifies and cools. The contraction has to go somewhere: it can pull the surface into a dip, pull the wax away from the vessel wall, or form an internal cavity below a skin of set wax. In a clear container these appear as wet spots, a sunken top or a visible gap at the glass. They are cosmetic unless the gap interferes with heat transfer.
Tunnelling is a pool that never reaches the edge
Candle tunnelling is a burn defect: the flame melts a narrow column around the wick and leaves wax on the perimeter. It has a different signature, a vertical crater rather than a surface dip, and a different cause, usually an undersized wick, a first burn that was too short, or a vessel diameter that the flame cannot heat. The confusion arises because shrinkage can make tunnelling worse by adding a thermal barrier.
| Feature | Shrinkage | Tunnelling |
|---|---|---|
| Where it appears | Top surface, wall contact, internal cavity | Around the wick, leaving a perimeter ring |
| When it appears | After cooling, before the first burn | During and after the first burns |
| Primary mechanism | Volume contraction and cooling rate | Heat supply below what the diameter requires |
| First fix to test | Pour temperature and cooling profile | Wick size and first-burn duration |
| Commercial effect | Mostly appearance | Wasted wax, short life, weak throw |
What shrinkage actually does
Surface sinks, wall gaps and internal voids
A sinkhole forms when the surface sets before the interior has finished contracting. The set skin holds its shape while the liquid below pulls away, leaving a depression that may be shallow or deep enough to expose the wick. A wall gap forms when the wax contracts away from the glass; in a clear vessel it reads as a pale patch or a bubble-like void behind the wax.
Soft container waxes may adhere better and show fewer gaps, while harder blends contract more visibly. Neither behaviour is a fault in itself. The question is whether the appearance meets the brand's standard and whether the gap is large enough to change the burn.
Why a second pour is common
Filling slightly above the final level and topping up after the first contraction is a standard way to close a sinkhole. It adds a process step and a second cooling cycle, and the interface between the two pours can remain visible in clear glass. A single-pour process depends more heavily on pour temperature and controlled cooling, which is why the same wax can look acceptable in one plant and poor in another.
Wet spots are not always a defect
Wet spots are areas where the wax has pulled away from the container, usually near the base or in patches along the wall. They are common in natural waxes and are largely cosmetic. They become a functional issue when they are large enough to insulate a section of the wall, or when the brand's quality standard treats them as unacceptable. Decide which before changing the formula.
Why an air gap insulates
The path from flame to wall
The thermal conductivity difference is large
Wax conducts heat roughly an order of magnitude better than air, and glass conducts better than wax. A millimetre of air between wax and glass is therefore a significant resistance in the path from the flame to the vessel wall. Heat that should have reached the perimeter is trapped in the wax, the pool stays narrow, and the candle behaves as if the vessel were smaller than it is.
This is the only route by which shrinkage contributes to tunnelling. The gap does not create the defect on its own, but it can turn a marginal wick into an inadequate one. That is why a formula that tunnels in a clear glass vessel may burn acceptably in an opaque tin, where the wax is in direct contact with a conductive metal wall.
The thermal balance behind tunnelling
Heat in, heat out, and the diameter
A melt pool reaches the edge when the heat delivered by the flame exceeds the heat lost through the wax, the wall and the surrounding air. The flame's heat output is set by the wick and the fuel, and the loss is set by the vessel's diameter, wall thickness and the room temperature. Increase the diameter without increasing the wick, and the balance tips toward a narrow pool.
The first burn matters because wax has a memory. A pool that melts to the edge and re-solidifies leaves a flat surface that later burns can extend. A pool that stops short leaves a raised ring, and each subsequent burn tends to retreat inside it. This is why a short first burn can produce candle tunnelling that a larger wick does not always fix.
Other contributors that look like shrinkage
An off-centre wick, a draft from a window, a wick trimmed too short, a high fragrance load that softens the wax, and a cold room all reduce the effective pool. Each has a different signature: an off-centre wick tunnels on one side, a draft produces an irregular pool, and a cold room slows the melt everywhere. Record the shape before changing the wick, because the shape points to the cause.
Pour and cooling variables
Shrinkage is controlled mostly by the cooling profile, not by adding more wax. A fast chill sets the surface early and increases the cavity; a slow, even cool lets the wax contract while it is still able to flow. The pour temperature has to be high enough to fill the vessel without trapping air and low enough to limit contraction.
| Variable | Effect when too high | Effect when too low | What to record |
|---|---|---|---|
| Pour temperature | More contraction, deeper sink | Premature set, air pockets | Measured temperature at pour |
| Room temperature | Slow set, uneven surface | Fast skin, internal void | Ambient and vessel temperature |
| Cooling rate | Stress and wall gaps | Surface sets before core | Time to full set |
| Fill level | Overflow and residue | Underfill after contraction | Hot fill weight and final level |
| Wick centring | Off-centre pool and tunnel | Wick buried or tilted | Position after set |
The process record is what makes a fix repeatable. Without pour temperature, room temperature and time to set, a change that works in one batch cannot be reproduced, and the defect returns when the weather changes.
Practical guide: diagnosing and fixing the crater
Step 1 — Classify the defect before touching the formula
Photograph the top, the wall contact and the burn pool. A surface dip with no burn history is shrinkage; a vertical crater after burning is candle tunnelling. The two need different fixes and often get the same one by default.
Step 2 — Measure the pool over the first three burns
Record pool diameter at one, two and three hours for each burn, and note where the wax stops. A pool that stalls at the same diameter every time points to wick size; a pool that varies points to draft or technique.
Step 3 — Check the gap at the wall
Look for wet spots and voids in a clear test vessel. If the gap is significant, a larger wick may only mask the problem, and the cooling profile needs attention first.
Step 4 — Fix shrinkage through the process, not the wick
Adjust pour temperature, cooling rate and fill level, and consider a top-up only if the appearance standard requires it. Record the parameters that produced an acceptable surface.
Step 5 — Fix tunnelling through the wick and the first burn
Run a wick ladder in the actual vessel and test the first burn to the intended duration. A wick change made without controlling the first burn will produce a result that does not survive consumer use.
Step 6 — Confirm in the vessel and the room the customer will use
Repeat the best configuration in the production vessel at a realistic room temperature, and add a draft case. Our note on wax, fragrance and wick science explains how load and wick interact in that test.
Step 7 — Keep the cooling record with the batch
File pour temperature, ambient temperature and time to set alongside the burn results, so a seasonal change in the plant does not become a mystery defect three months later.
Frequently asked questions
What is private label candle manufacturing?
The manufacturer produces the candle to your specification, fills the vessel and packaging you chose, and packs it for your brand. You control positioning; they control the process and records.
What is a typical minimum order?
Look at the vessel before the wax. A glass or ceramic mould carries a minimum that the wax and fragrance never do.
How long does development take?
Weeks, not days, once vessel samples, wick trials and burn tests are included. Freight booking often pushes the date.
Is tunnelling caused by wax shrinkage?
Not directly. Tunnelling is a heat-balance problem, usually a wick that is too small for the diameter or a first burn that was too short. Shrinkage can worsen it by leaving an insulating air gap.
Will a bigger wick always fix a tunnel?
No. If the first burn was too short or the vessel is in a draft, a bigger wick can produce soot or overheating without fixing the pool. Correct the cause before changing the wick.
Why does my candle tunnel only in clear glass?
Clear glass shows the wall gap that opaque containers hide, and the gap insulates the wax from the wall. The burn may be marginal in both, but only the clear vessel reveals it.
Does a second pour prevent shrinkage?
It hides the surface sink but does not remove the contraction. It also adds a cooling cycle and a visible interface in clear glass, so it should be a deliberate appearance decision.
How long should the first burn be?
Long enough for the pool to reach the edge of the vessel, which depends on diameter and wick. Test it rather than quoting a fixed hour count, and put the result in the care instructions.
Conclusion
Shrinkage and tunnelling are different failures that share a visual language. Shrinkage is a cooling and contraction problem that mostly affects appearance, while tunnelling is a heat-balance problem that wastes wax and shortens the candle's life. An air gap can connect the two, but it is rarely the root cause.
Diagnose by shape and by timing, fix shrinkage in the process and candle tunnelling in the wick and first burn, and keep the cooling record with the batch. That discipline is what stops a seasonal plant change from being rediscovered as a customer complaint.
Discuss your fragrance programme with our team:
WhatsApp: +86 17324762943
Email: adon@customperfumeoem.com
Website: customperfumeoem.com